背景 传统的将数据集中存储至单一数据节点的解决方案,在性能、可用性和运维成本这三方面已经难于满足互联网的海量数据场景。
从性能方面来说,由于关系型数据库大多采用 B+ 树类型的索引,在数据量超过阈值的情况下,索引深度的增加也将使得磁盘访问的 IO 次数增加,进而导致查询性能的下降;同时,高并发访问请求也使得集中式数据库成为系统的最大瓶颈。
从可用性的方面来讲,服务化的无状态型,能够达到较小成本的随意扩容,这必然导致系统的最终压力都落在数据库之上。而单一的数据节点,或者简单的主从架构,已经越来越难以承担。数据库的可用性,已成为整个系统的关键。
从运维成本方面考虑,当一个数据库实例中的数据达到阈值以上,对于 DBA 的运维压力就会增大。数据备份和恢复的时间成本都将随着数据量的大小而愈发不可控。一般来讲,单一数据库实例的数据的阈值在 1TB 之内,是比较合理的范围。
在传统的关系型数据库无法满足互联网场景需要的情况下,将数据存储至原生支持分布式的 NoSQL 的尝试越来越多。 但 NoSQL 对 SQL 的不兼容性以及生态圈的不完善,使得它们在与关系型数据库的博弈中始终无法完成致命一击,而关系型数据库的地位却依然不可撼动。
数据分片指按照某个维度将存放在单一数据库中的数据分散地存放至多个数据库或表中以达到提升性能瓶颈以及可用性的效果。 数据分片的有效手段是对关系型数据库进行分库和分表。分库和分表均可以有效的避免由数据量超过可承受阈值而产生的查询瓶颈。 除此之外,分库还能够用于有效的分散对数据库单点的访问量;分表虽然无法缓解数据库压力,但却能够提供尽量将分布式事务转化为本地事务的可能,一旦涉及到跨库的更新操作,分布式事务往往会使问题变得复杂。 使用多主多从的分片方式,可以有效的避免数据单点,从而提升数据架构的可用性。
通过分库和分表进行数据的拆分来使得各个表的数据量保持在阈值以下,以及对流量进行疏导应对高访问量,是应对高并发和海量数据系统的有效手段。 数据分片的拆分方式又分为垂直分片和水平分片。
垂直分片 按照业务拆分的方式称为垂直分片,又称为纵向拆分,它的核心理念是专库专用。 在拆分之前,一个数据库由多个数据表构成,每个表对应着不同的业务。而拆分之后,则是按照业务将表进行归类,分布到不同的数据库中,从而将压力分散至不同的数据库。 下图展示了根据业务需要,将用户表和订单表垂直分片到不同的数据库的方案。
垂直分片 垂直分片往往需要对架构和设计进行调整。通常来讲,是来不及应对互联网业务需求快速变化的;而且,它也并无法真正的解决单点瓶颈。 垂直拆分可以缓解数据量和访问量带来的问题,但无法根治。如果垂直拆分之后,表中的数据量依然超过单节点所能承载的阈值,则需要水平分片来进一步处理。
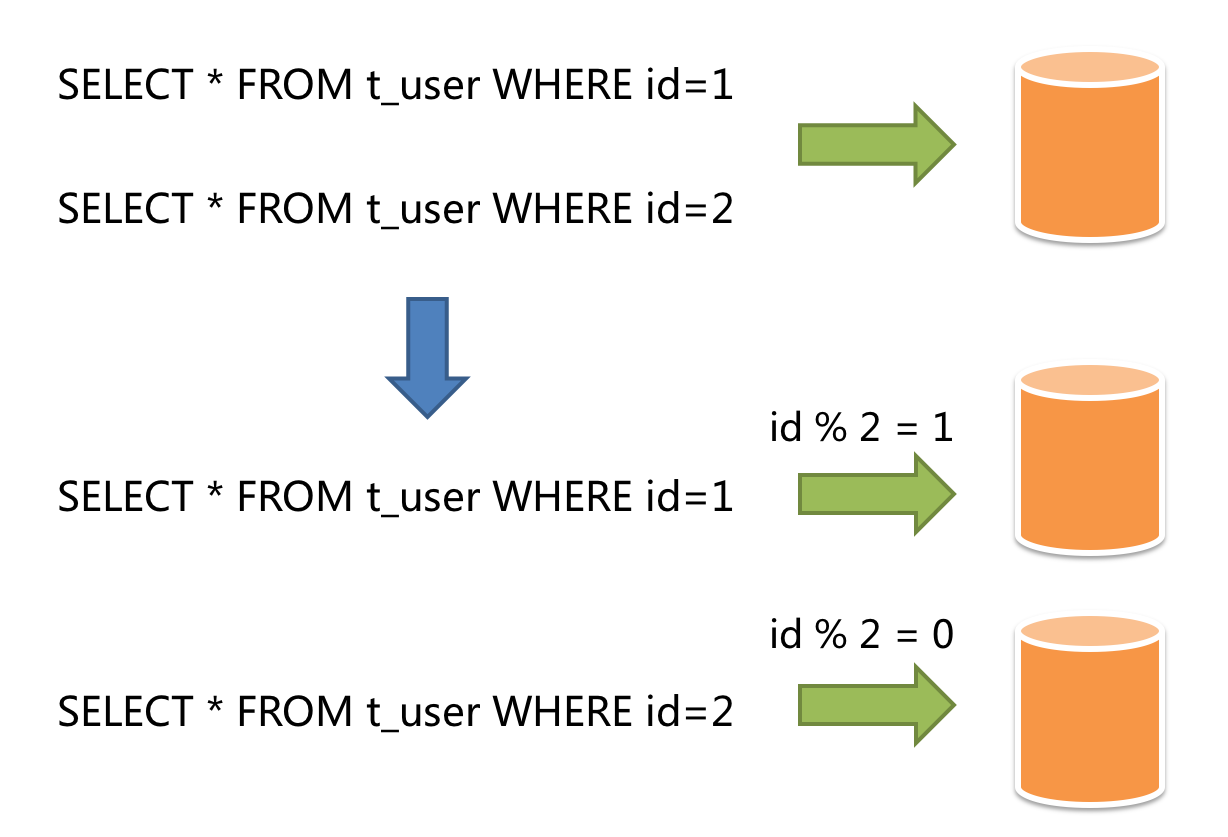
水平分片 水平分片又称为横向拆分。 相对于垂直分片,它不再将数据根据业务逻辑分类,而是通过某个字段(或某几个字段),根据某种规则将数据分散至多个库或表中,每个分片仅包含数据的一部分。 例如:根据主键分片,偶数主键的记录放入 0 库(或表),奇数主键的记录放入 1 库(或表),如下图所示。
水平分片
水平分片从理论上突破了单机数据量处理的瓶颈,并且扩展相对自由,是分库分表的标准解决方案。
挑战 虽然数据分片解决了性能、可用性以及单点备份恢复等问题,但分布式的架构在获得了收益的同时,也引入了新的问题。
面对如此散乱的分库分表之后的数据,应用开发工程师和数据库管理员对数据库的操作变得异常繁重就是其中的重要挑战之一。他们需要知道数据需要从哪个具体的数据库的分表中获取。
另一个挑战则是,能够正确的运行在单节点数据库中的 SQL,在分片之后的数据库中并不一定能够正确运行。例如,分表导致表名称的修改,或者分页、排序、聚合分组等操作的不正确处理。
跨库事务也是分布式的数据库集群要面对的棘手事情。 合理采用分表,可以在降低单表数据量的情况下,尽量使用本地事务,善于使用同库不同表可有效避免分布式事务带来的麻烦。 在不能避免跨库事务的场景,有些业务仍然需要保持事务的一致性。 而基于 XA 的分布式事务由于在并发度高的场景中性能无法满足需要,并未被互联网巨头大规模使用,他们大多采用最终一致性的柔性事务代替强一致事务。
目标 尽量透明化分库分表所带来的影响,让使用方尽量像使用一个数据库一样使用水平分片之后的数据库集群,是 Apache ShardingSphere 数据分片模块的主要设计目标。
Hello World Demo 以下为一个demo简单示例。我们将user水平切分为3张表,根据id hash存储到对应的表中。
准备环境 准备mysql。这里采用docker(https://github.com/Ryan-Miao/docker-china-source/tree/master/docker-mysql)创建一个mysql实例。
1
2
3
git clone https://github.com/Ryan-Miao/docker-china-source.git cd docker-mysql sudo docker-compose up
连接mysql并创建表:
1
2
3
4
5
6
7
8
9
10
11
12
13
14
15
16
17
18
19
20
21
22
23
24
25
26
27
28
29
30
31
32
33
34
35
36
show databases ;drop database if exists test0;drop database if exists test1;drop database if exists test2;create database test0;create database test1;create database test2;use test0;drop table if exists user0;drop table if exists user1;drop table if exists user2;create table user0( id bigint (11 ) not null auto_increment primary key , name varchar (11 ) not null default '' , city_name varchar (11 ) not null default '' ); create table user1 like user0;create table user2 like user0;use test1;drop table if exists user0;drop table if exists user1;drop table if exists user2;create table user0( id bigint (11 ) not null auto_increment primary key , name varchar (11 ) not null default '' , city_name varchar (11 ) not null default '' ); create table user1 like user0;create table user2 like user0;
准备一个Springboot工程 这里简单创建一个Springboot项目。见https://github.com/Ryan-Miao/sharding-demo
简单引入web, mysql, mybatis-plus, sharding-sphere
1 2 3 4 5 6 7 8 9 10 11 12 13 14 15 16 17 18 <dependency > <groupId > org.springframework.boot</groupId > <artifactId > spring-boot-starter-web</artifactId > </dependency > <dependency > <groupId > com.baomidou</groupId > <artifactId > mybatis-plus-boot-starter</artifactId > <version > 3.4.3.1</version > </dependency > <dependency > <groupId > mysql</groupId > <artifactId > mysql-connector-java</artifactId > </dependency > <dependency > <groupId > org.apache.shardingsphere</groupId > <artifactId > sharding-jdbc-spring-boot-starter</artifactId > <version > 4.1.1</version > </dependency >
启动类DemoApplication
1
2
3
4
5
6
7
8
9
10
11
12
13
14
15
16
17
import org.mybatis.spring.annotation.MapperScan;import org.springframework.boot.SpringApplication;import org.springframework.boot.autoconfigure.SpringBootApplication;@MapperScan(basePackages = { "com.example.demo.user.mapper" }) @SpringBootApplication public class DemoApplication public static void main (String[] args) SpringApplication.run(DemoApplication.class, args); } }
创建entity对象User
1 2 3 4 5 6 7 8 9 10 11 12 13 14 15 @Data @EqualsAndHashCode(callSuper = false) @ApiModel(value = "User对象", description = "") @TableName("user") public class User implements Serializable private static final long serialVersionUID = 1L ; private Long id; private String name; private String cityName; }
核心重点配置文件如下application.yml
1
2
3
4
5
6
7
8
9
10
11
12
13
14
15
16
17
18
19
20
21
22
23
24
25
26
27
28
29
30
31
32
33
34
35
36
37
38
39
40
spring: shardingsphere: datasource: names: test0,test1 test0: type: com.zaxxer.hikari.HikariDataSource driverClassName: com.mysql.cj.jdbc.Driver jdbcUrl: "jdbc:mysql://localhost:3306/test0?useUnicode=true&characterEncoding=utf8&allowMultiQueries=true&serverTimezone=Asia/Shanghai" username: root password: 123456 test1: type: com.zaxxer.hikari.HikariDataSource driverClassName: com.mysql.cj.jdbc.Driver jdbcUrl: "jdbc:mysql://localhost:3306/test1?useUnicode=true&characterEncoding=utf8&allowMultiQueries=true&serverTimezone=Asia/Shanghai" username: root password: 123456 sharding: default-database-strategy: inline: sharding-column: id algorithm-expression: test0 tables: user: actualDataNodes: test$->{0..1}.user$->{0..2} table-strategy: inline: shardingColumn: id algorithmExpression: user$->{id % 3 } keyGenerator: type: SNOWFLAKE column: id props: sql.show: true mybatis-plus: mapper-locations: "classpath*:/mapper/**/*.xml"
创建UserMapper
1
2
3
4
5
6
7
8
9
10
11
12
13
14
15
16
17
18
19
package com.example.demo.user.mapper;import com.baomidou.mybatisplus.core.mapper.BaseMapper;import com.example.demo.user.entity.User;import org.springframework.stereotype.Component;import java.util.List;@Component public interface UserMapper extends BaseMapper <User > }
编写一个Unit Test类, 我们制造一批数据:
1
2
3
4
5
6
7
8
9
10
11
12
13
14
15
16
17
18
19
20
21
22
23
24
25
26
27
28
29
30
31
32
33
34
35
36
37
38
39
40
package com.example.demo;import com.example.demo.user.entity.User;import com.example.demo.user.service.IUserService;import org.junit.jupiter.api.Test;import org.junit.runner.RunWith;import org.springframework.beans.factory.annotation.Autowired;import org.springframework.boot.test.context.SpringBootTest;import org.springframework.test.context.junit4.SpringRunner;import java.util.ArrayList;import java.util.Arrays;import java.util.List;import java.util.Random;@RunWith(SpringRunner.class) @SpringBootTest(classes = {DemoApplication.class}) class DemoApplicationTests @Autowired private IUserService userService; @Test void insert () List<String> cityList = Arrays.asList("北京市" , "深圳市" , "重庆市" , "上海市" , "武汉市" , "成都市" , "广州市" ); int initialCapacity = 10000 ; Random random = new Random(); List<User> list = new ArrayList<>(initialCapacity); for (int i = 0 ; i < initialCapacity; i++) { User user = new User(); user.setName("a_" + i); int index = random.nextInt(7 ); user.setCityName(cityList.get(index)); list.add(user); } userService.saveBatch(list); } }
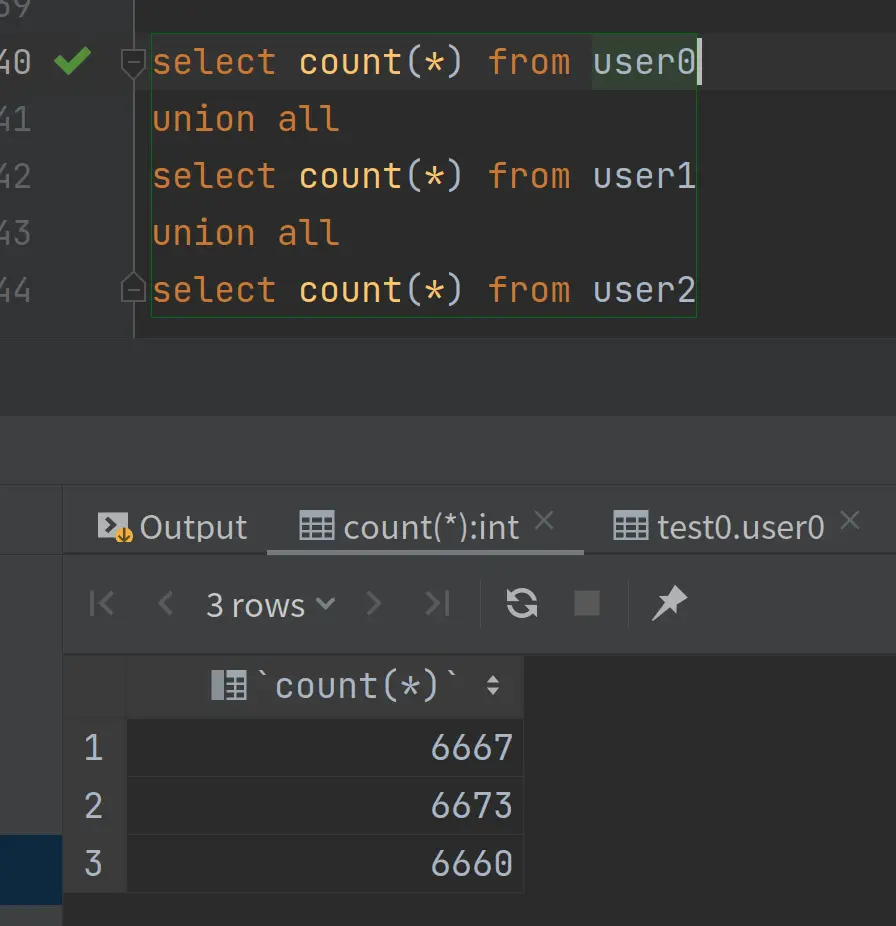
数据库查询:
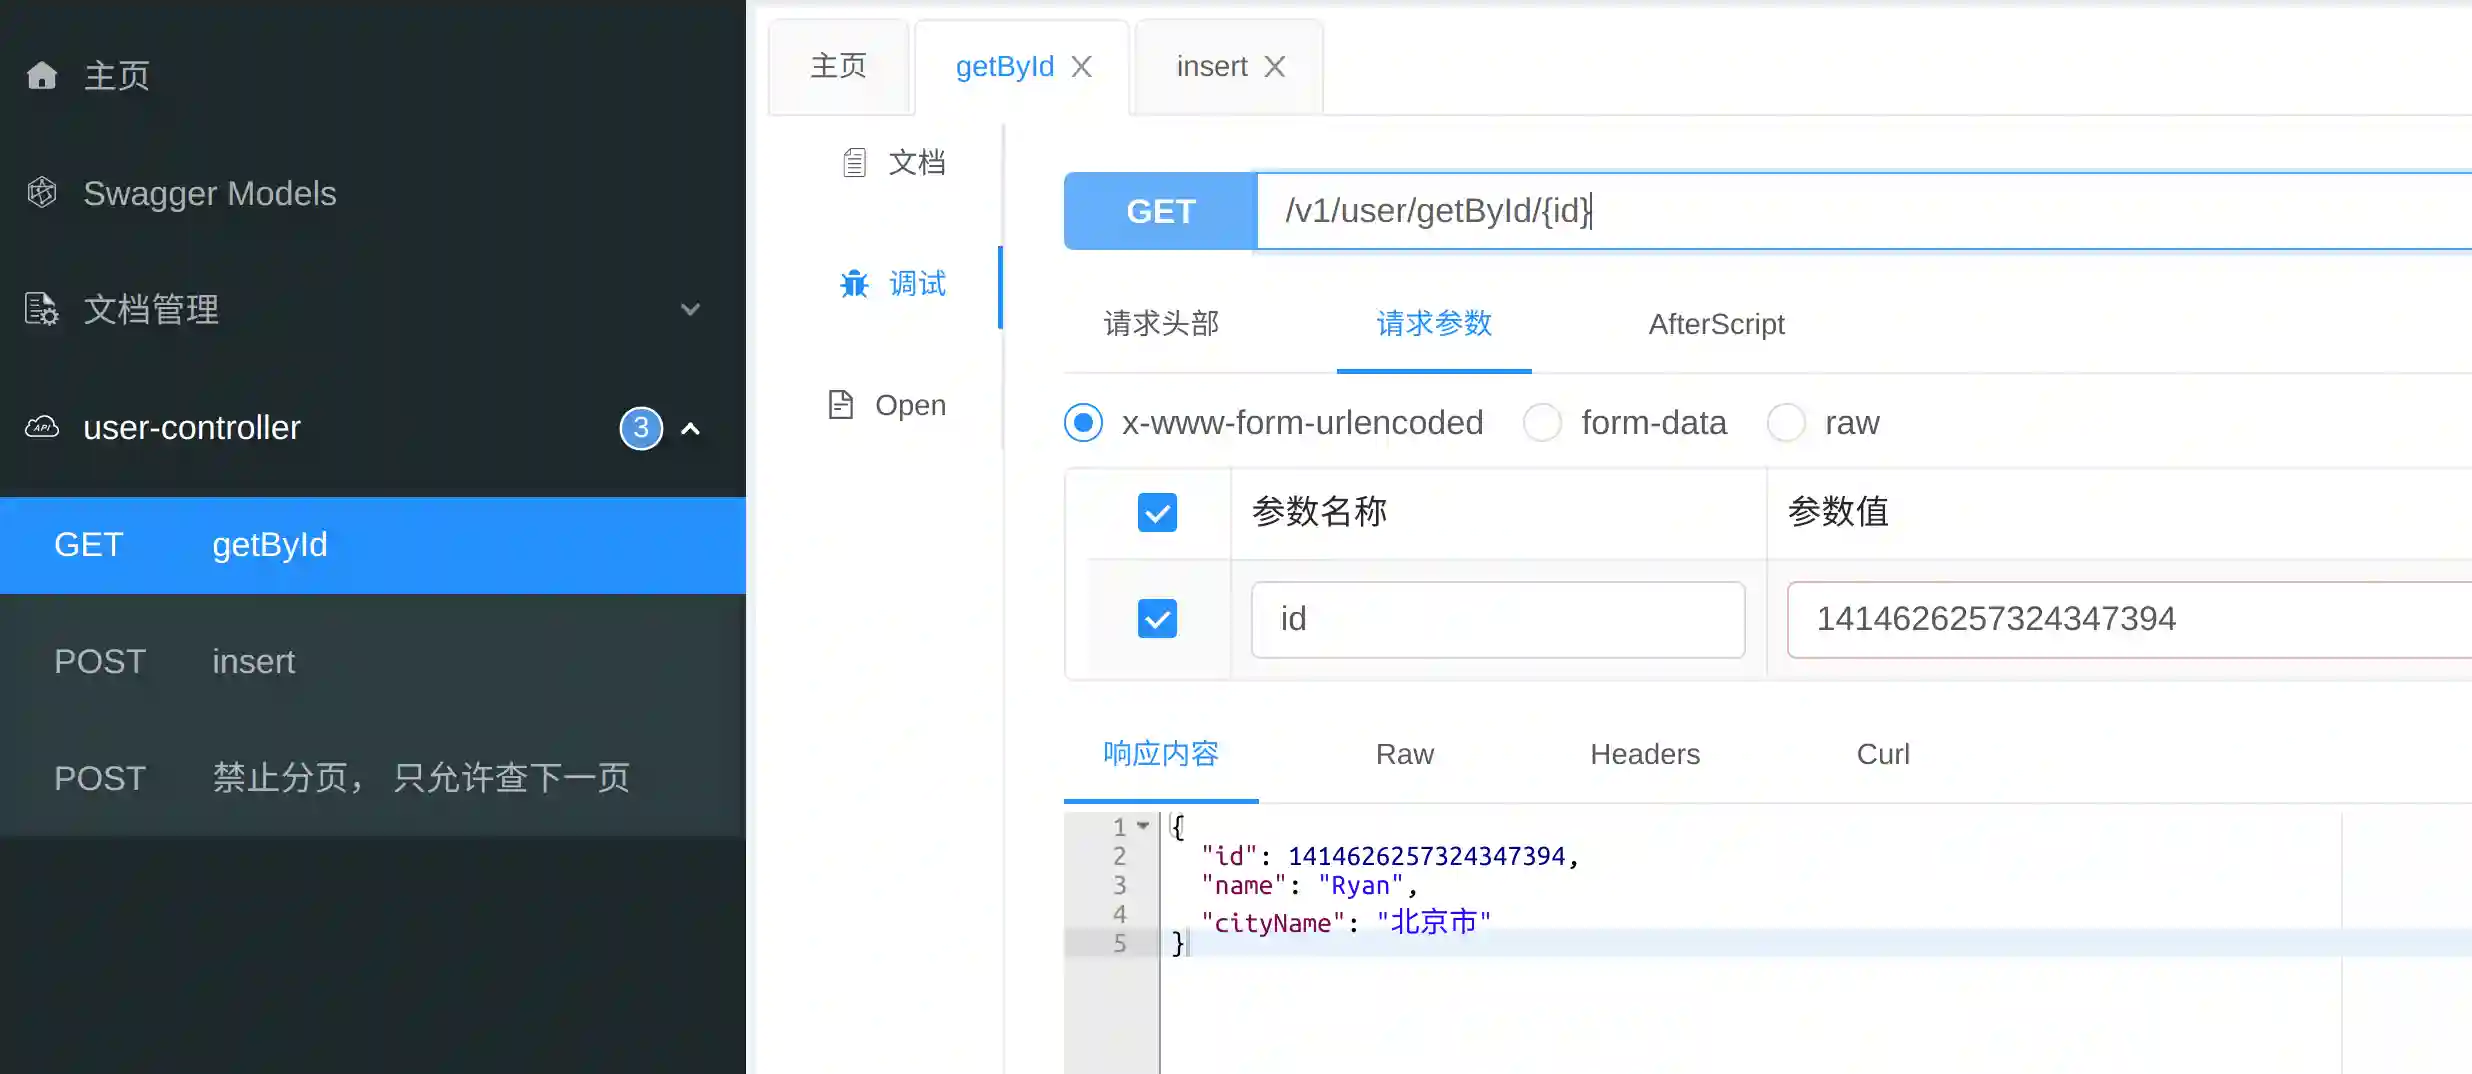
接口查询:
上述demo,基本实现了分表算法:按id hash。插入的时候自动生成分布式id,自动计算路由存储到对应的表。查询的时候自动计算路由,返回查询结果。
注意,上述demo采用inline的分表策略,目前只支持按id=来查询。复杂的查询应该走es查询id,再反查全部。
参考